Tag Archives: wheel lug nut

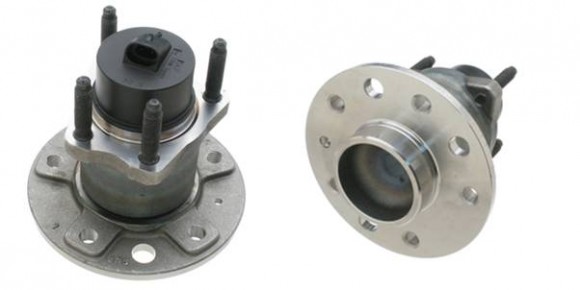
10 Ways to Spot a Worn Wheel Hub Bearing

Picture3

Hearing abnormal noise is one of the most basic signs of a bad wheel bearing or wheel hub bearing.  However, some may be difficult to detect, because a worn wheel hub may vary in severity.  Often, the wheel hub bearing will be damaged even before the signs will be detected.  But if you know other indicators of a worn wheel hub, you can prevent more damage.

1.       Rumbling, growling or humbling noise.   As mentioned, noise is one of the classic damage indicators.  These noises are normally related to the tire or any of the electrical and drive train components.  If it has something to do with the bearing, you should hear the noise or vibration when you are driving in a straight line, and should intensify when you turn the steering wheel to the right or left.  Normally, the side that is opposite the noise is the defective side.

2.       Grinding when the vehicle is moving.  Usually, this indicates mechanical damage in the wheel-end system, or a loss of integrity of the bearing, like a roller or raceway damage.  You should hear the noise when you are turning or when there is a shift in load.

3.       Clicking, popping or snapping.  These can mean a worn or damaged outer CV-joint.  Or, it can also be related to too much bearing endplay, which is associated with inadequate clamping.  These noises are usually heard when cornering or making sharp turns.

4.       Knocking or clunking.  These might be caused by excessive play in the CV-joints or U-joints, or by extreme backlash in the differential gears.  You should hear these sounds when shifting from changing directions, ex. from forward to reverse, or shifting from accelerating to coasting.  But normally, it is not associated with the bearings. 

5.       Shudder or vibration at constant speed.   Some shimmy or unwanted vibration is usually related with worn or damaged suspension parts or tires that are either out-of-balance or out-of-round.  It is not usually associated with hub or bearing damage.

6.       Wheel vibration.  When the wheel vibrates or wobbles abnormally, it is most often related to a damaged or worn tire, or the wheel or suspension parts, or maybe even some severe misalignment in the chassis.  There might be chances that it is related to the hub or the bearing, and it usually means you have lost a clamp or you have a bearing with extreme mechanical damage.   Another possibility is when the lug nuts are not properly torqued.

7.       Abnormal tire wear.  Unevenness or abnormality in tire wear may be caused by several different things.  Mostly, these are worn or damaged suspension components, improper alignment, or even bad tire selection or inflation.    There is a slight chance that it is also caused by some damage in the bearing, or its looseness, but it is not as common as the others previously mentioned.

8.       Uneven rotor or brake pad wear.  Severe looseness in a worn or damaged bearing can cause extreme run-out, which can cause uneven wear on the brake pads or the rotor.  But more often, it is caused by a bad caliper or a bad equalizer, and the most common cause is a warped rotor, when the caliper is not retracting.

9.       Abnormal side pull when braking.  This can also be caused by worn brakes or rotors, but are usually associated with a defective caliper or equalizer.  Also, when there is severe looseness of the bearing, it can also cause extreme run-out, causing the brakes to pulsate or pull. 

10.   ABS Failure.  In more extreme cases, the internal and external sensors may have some damage due to too much movement from excessive end-play.  This can mean a loss or missing bearing clamp, which is usually due to mechanical damage. 

If you encounter any of the signs mentioned here, do not delay and take immediate action.  If you don’t this may result in bigger and more serious damage in both your vehicle, and your life.  Of course, correct handling procedures are essential, and proper maintenance must be kept up at all times.  While you may do some checking and repair by yourself, remember to always follow the installation instructions given by your car manufacturer.

It is now increasingly easier to get help and any car parts that you need.  For reliable car parts with amazing discounts, please check http://www.autopartsway.com/carparts.cfm.

The Top 6 Tools to Pack for Auto Travel

Tool Kit

When traveling, drivers usually expect things to go smoothly, but there are some tools to carry with you, just in case, because auto parts do malfunction, and emergencies do happen. Even the most basic tool can be a lifesaver if you find yourself stranded miles from an auto parts store. While the chances of a breakdown may be unlikely, it’s best to be prepared.

What to Pack in Your Toolkit

A hammer is the first thing to pack in your kit. Your hammer can be handy for loosening stubborn auto parts during unexpected repairs. The claw end is useful for prying uncooperative auto parts. The next items are a multi-head screwdriver and an adjustable wrench. Some auto parts are attached with screws, while others use bolts. The next item is a flashlight. If things go wrong, they tend to do so at night. Pliers are useful tools, also. Lastly, duct tape is the driver’s best friend. If something is loose, duct tape it. If a window is broken, cover it with duct tape. If a seat cover rips, you guessed it – use duct tape.

Jumpstarting a Dead Battery

Pliers can scrape corrosion from battery terminals before connecting battery cables, which are available from auto parts stores, when jumpstarting a car. Clean the battery terminals with your pliers and connect the battery cables to the battery terminals. Be sure to connect the battery cables to the corresponding battery terminals. Red battery cables are usually, though not always, positive while the black battery cables are usually, but not always, negative. Attach the positive cables beginning with the dead battery, then the negative starting with the good battery. Start the car with the good battery first, allowing the dead battery to charge for a few minutes before cranking. Wait a few more minutes before removing the cables in the reverse order that they were attached.

Changing a Tire

The most common auto parts to repair are flat tires. To do this you may have to use all of the tools listed, other than the pliers. Start with removing the wheel cover.  To remove the wheel cover, lighting your way with your flashlight, pry it loose with the claw of your hammer or with your screwdriver. Your jack and wheel lug nut wrench should be located near your spare tire. Use the lug wrench to loosen one wheel lug nut at a time, but don’t remove them. If a wheel lug nut is difficult to turn, attach the lug wrench and tap it with your hammer. Be sure that you’re turning the wheel lug nut in a counter clockwise direction. After this, jack the car up slowly. Then remove the lug nuts and the wheel. The spare tire should then replace the flat tire. Replace the wheel lug nuts, but don’t tighten completely. Lower the car slowly and remove the jack. There are usually five lug nuts, and they should be tightened by skipping every other one, continuing around until all are tightened. If there are an even number then you tighten one, then the opposite, repeating with the next pair to the right. Replace the wheel cover, patching it, and other auto parts, with duct tape if it cracked during removal. Visit a tire or auto parts store for a new tire as quickly as possible.

Switch to our mobile site