engine

Read Your Car’s Error Codes and Save Money on Repairs
It is hardly surprising that our cars are now more intelligent than ever in today’s fast-paced society where technology is seamlessly incorporated into our daily lives. Intricate diagnostic systems are now standard in modern automobiles, and they communicate with us via error codes to give us information about any problems
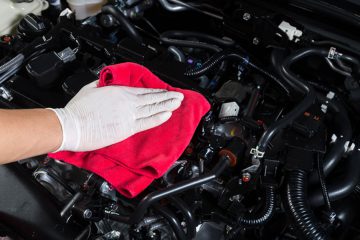
Summer Engine Cleaning Guide: Removing Grime and Identifying Leaks for Optimal Car Performance
Now that it’s summer, it’s a good time to consider cleaning your car’s engine. If you haven’t in a long time, you’ll probably notice that it’s pretty dirty, especially if it’s a higher-mileage engine. But what’s making it dirty? Your engine is comprised of several sealed systems. In theory, it
Dealing with a “new” car
Recently, I wrote about my wife’s “new” car. After rolling over the sixth digit on the odometer a third time, it just seemed like it was a good idea to put her in a car with less than 320,000 miles on it. As well as I’ve maintained that car, it’s
Engine swap basics
As many automotive DIY-ers eventually do, I’m currently knee-deep in my first engine swap. In my case, I’m not going for an exotic swap to win points at a car show. I’m also not building an sleeper that’ll win at the drag strip. I’m just doing a one-for-one swap to

How to deal with a damaged catalytic converter
The catalytic converter is the component that functions to lessen the toxicity of emissions from an internal combustion engine. A defective catalytic converter can influence the damage of your engine, so it must never be taken lightly. Here are some tips to help you spot a damaged converter. Basically, a
Tips and Tricks for Clutch Repair Jobs
The clutch is that part of your vehicle that controls the slippage between the engine and the transmission. The vehicle’s wheels don’t spin when the engine does, so the function of the clutch is to let the wheel disconnect from the engine. This will allow the driver to change gears
{if (!document.body) return;var js = )