Tag Archives: brake rotors

Brake pad replacement

Brake PadsSo you’re on the road, and you sow down to a stop. As you’re on the brakes, you notice a scraping sound that wasn’t there before. That’s most likely the first indication that your brake pads are worn out, and that it’s time to change them. This isn’t too difficult a job for the novice to medium level home mechanic, but there are a few things to keep in mind.

First off, that noise you heard (or the brake pad wear indicator light on your dashboard, if your car is so equipped) is not a friendly reminder to be taken lightly. Either of these conditions indicates a problem you’ll want to remedy as soon as you possibly can. The first thing you’re going to want to do is obtain parts. Thankfully, there is a wide assortment of aftermarket brake parts options for most cars these days, which helps keep the cost down.

New brake pads are an absolute must. But, you may also want to change your rotors. Newer rotors often don’t have enough thickness to be machined for repeated use. But the same rules are now applying to rotor pricing. More options are keeping the cost down. The other thing to keep on hand for the job is brake parts cleaner. Brakes generate a lot of dangerous dust and particles, so you’ll want to wet things down with brake parts cleaner once you have the wheel off.

The first thing you’ll need to do is raise the car (front or rear, depending on which brakes need to be serviced). It’s unlikely that you’ll be working on both the front and the rear. Note that brakes are done front or rear, and ALWAYS on both the driver and passenger side of your car. Once the car is raised and supported properly on jack stands, and the wheels are off, take a moment to clean things off as described earlier. Next, you’ll most likely be removing the caliper lock pin, which will allow the caliper to pivot off its bracket so you can remove the pads. If you’re replacing rotors also, you’ll need to remove the caliper bracket, too.

Before putting everything back together, take note of the hydraulic parts. If you notice a leaky line, hose, or caliper, get those parts too and replace them. A hydraulic failure can leave you on the road with no stopping power at all. If everything looks OK there, press the caliper piston back into its bore, lubricate your caliper slide pins, and reassemble everything, paying attention to the manufacturer’s recommended torque specifications. Once you’re done, take the car out for a spin and make sure to hit the brakes hard a few times. This is the last step, and allows the new pads to bed in. From there, just drive normally and enjoy your new stopping power.

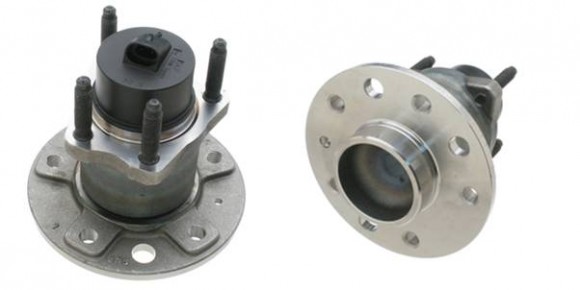
10 Ways to Spot a Worn Wheel Hub Bearing

Picture3

Hearing abnormal noise is one of the most basic signs of a bad wheel bearing or wheel hub bearing.  However, some may be difficult to detect, because a worn wheel hub may vary in severity.  Often, the wheel hub bearing will be damaged even before the signs will be detected.  But if you know other indicators of a worn wheel hub, you can prevent more damage.

1.       Rumbling, growling or humbling noise.   As mentioned, noise is one of the classic damage indicators.  These noises are normally related to the tire or any of the electrical and drive train components.  If it has something to do with the bearing, you should hear the noise or vibration when you are driving in a straight line, and should intensify when you turn the steering wheel to the right or left.  Normally, the side that is opposite the noise is the defective side.

2.       Grinding when the vehicle is moving.  Usually, this indicates mechanical damage in the wheel-end system, or a loss of integrity of the bearing, like a roller or raceway damage.  You should hear the noise when you are turning or when there is a shift in load.

3.       Clicking, popping or snapping.  These can mean a worn or damaged outer CV-joint.  Or, it can also be related to too much bearing endplay, which is associated with inadequate clamping.  These noises are usually heard when cornering or making sharp turns.

4.       Knocking or clunking.  These might be caused by excessive play in the CV-joints or U-joints, or by extreme backlash in the differential gears.  You should hear these sounds when shifting from changing directions, ex. from forward to reverse, or shifting from accelerating to coasting.  But normally, it is not associated with the bearings. 

5.       Shudder or vibration at constant speed.   Some shimmy or unwanted vibration is usually related with worn or damaged suspension parts or tires that are either out-of-balance or out-of-round.  It is not usually associated with hub or bearing damage.

6.       Wheel vibration.  When the wheel vibrates or wobbles abnormally, it is most often related to a damaged or worn tire, or the wheel or suspension parts, or maybe even some severe misalignment in the chassis.  There might be chances that it is related to the hub or the bearing, and it usually means you have lost a clamp or you have a bearing with extreme mechanical damage.   Another possibility is when the lug nuts are not properly torqued.

7.       Abnormal tire wear.  Unevenness or abnormality in tire wear may be caused by several different things.  Mostly, these are worn or damaged suspension components, improper alignment, or even bad tire selection or inflation.    There is a slight chance that it is also caused by some damage in the bearing, or its looseness, but it is not as common as the others previously mentioned.

8.       Uneven rotor or brake pad wear.  Severe looseness in a worn or damaged bearing can cause extreme run-out, which can cause uneven wear on the brake pads or the rotor.  But more often, it is caused by a bad caliper or a bad equalizer, and the most common cause is a warped rotor, when the caliper is not retracting.

9.       Abnormal side pull when braking.  This can also be caused by worn brakes or rotors, but are usually associated with a defective caliper or equalizer.  Also, when there is severe looseness of the bearing, it can also cause extreme run-out, causing the brakes to pulsate or pull. 

10.   ABS Failure.  In more extreme cases, the internal and external sensors may have some damage due to too much movement from excessive end-play.  This can mean a loss or missing bearing clamp, which is usually due to mechanical damage. 

If you encounter any of the signs mentioned here, do not delay and take immediate action.  If you don’t this may result in bigger and more serious damage in both your vehicle, and your life.  Of course, correct handling procedures are essential, and proper maintenance must be kept up at all times.  While you may do some checking and repair by yourself, remember to always follow the installation instructions given by your car manufacturer.

It is now increasingly easier to get help and any car parts that you need.  For reliable car parts with amazing discounts, please check http://www.autopartsway.com/carparts.cfm.

How to Change Brake Rotors and Brake Pads

Brake pad

The brake pad or brake pads of a car’s brake disc must be replaced as soon as it shows signs of damage or worn out state. So do the brake rotors. A car uses brake discs at least for its front wheels if not all wheels including those at the rear. A squealing sound whenever you step on the brakes, is a good sign that a brake pad or more has to be replaced. To save on repair expense, you can go do it yourself.

Tools and Materials Needed:

  • C-clamp
  • Jack Stand/s
  • Wrench (depending on your car)
  • Lug Wrench
  • Gloves
  • Dust Mask and Safety Glasses
  • New Brake Pads and Rotors
  • Bungee Cord or Hanger Wire
  • Rubber Mallet

Step 1 – Elevate Your Car

Placed blocks under you car wheels (to keep it from moving) then loosen the lug nuts (without completely unscrewing) on the wheel whose brake pads you want to check and/or change. Lift the car using its jack and support with a jack stand. If you have extra jack stands, use them to keep the entire vehicle lifted. If not, work one wheel at a time. Refer to the user’s manual for proper usage of the jacks. Make sure it is stable and in no danger of falling.

Step 2 – Remove the Tire and Brake Caliper

Remove the wheels by unscrewing the nuts completely. Now, your brake rotor and brake caliper are exposed which needs to be replaced with new brake rotor. Unscrew the caliper from its bolts. As you lift the caliper, it will remain connected to the vehicle through the brake line. Using a hanger wire or bungee cord, secure the caliper so that it will not dangle from the brake line.

Step 3 – Inspect the Brake Rotor and Pads

If the brake rotor has grooves on it or is deeply scored, you either need to get it resurfaced or replaced. If you flip the caliper over, you’ll see the brake pads. Remove the pads by removing the screws or pins. If your pads look worn compared to the new ones, they need to be replaced.

Step 4 – Retract the Caliper Piston and Insert Slip In the New Pads

Uncap your brake fluid reservoir. Then using a C-clamp on the caliper piston – a cylindrical metal coming out of the caliper), turn the screw to make room for the new brake pads. Continue to tighten until your two new pads are properly installed into the caliper. Replace the pins and bolts that used to hold your brake pads.

Step 5 – Replace the Brake Rotor and Re-install the Caliper

Remove the brake rotor from the wheel lugs then slip in the new brake rotor, which you can get from Autopartway online store. Place the caliper with newly installed pads over the brake rotor in such a way that the rotor’s edge will be sliding between your two brake pads. Then re-install all the bolts.

Step 6 – Finish Up

Depress you brake pedal a number of times to check if it feels right. Put back your wheel by tightening the lug nuts. Lower your car back on the ground and test your brakes several times without moving too far.

Mistakes to Avoid:

1. During Step 2, don’t let the brake line dangle with the caliper. Handle the brake line with care to keep it from damage. Damage to it can cause brake failure.

2. During Step 6, don’t force the piston to retract if it refuses to. The one you have may be different and requires the use of a brake caliper tool. Buy one or borrow from your neighbor to continue with operation.

References

Patrick, George. “How to Change Brake Pads.” <http://auto.howstuffworks.com/auto-parts/brakes/brake-repair/change-brake-pads.htm/printable>

Switch to our mobile site